
Media Wall Ideas: Fires, Shelving, Lighting and Hidden Storage
By David Abbott, Director · · 7 min read
Practical media wall ideas, from floating walls and TV recesses to fire placement, shelving, LED lighting, Venetian plaster and hidden storage, explained by the builders who build them.
The best media wall ideas start with the room, not the TV. Decide first between a floating feature and a full floor-to-ceiling wall, then where the screen and fire will sit, and only then layer in shelving, lighting, storage and a finish. Get those decisions in the right order and the wall looks built-in and calm; get them in the wrong order and it looks like a stage set.
Below we run through the design choices we talk homeowners through most often, from TV recesses and fire placement to slatted panels, Venetian plaster and hidden storage. They are all things we build, so each idea comes with the practical point that decides whether it works in your room.
Floating or floor-to-ceiling?
A floor-to-ceiling media wall runs from skirting to ceiling and usually from corner to corner, or at least across most of the wall. It reads as architecture rather than furniture, which suits a large living room or an open-plan space that needs a strong focal point. It also gives the most space inside the frame for cabling, a fire box and storage.
A floating media wall stops short of the ceiling, the floor, or both. It might be a raised panel that houses the TV and fire with open wall around it, or a section that sits on a plinth with a shadow gap beneath. Floating designs feel lighter and work well in rooms with low ceilings, awkward coving or a window close to one side, where a full wall would crowd things.
A good middle ground is a full-height centre section with lower units or open shelving either side. It gives you the presence of a full wall without boxing in the whole room.
Getting the TV recess right
A recessed TV is what makes a media wall look finished. Instead of the screen sticking out on a bracket, it sits in a niche so its face is flush with, or just behind, the wall. A few things decide whether that works:
- Size the recess to your actual TV. Leave a small, even margin all round so the screen looks framed, not squeezed, and allow room behind it for the bracket, cables and some airflow.
- Think about your next TV. Screens tend to get bigger. A slightly larger recess with a painted or lit backing can take a bigger set later without rebuilding the wall.
- Plan the fixings before boarding. We put timber noggins exactly where the bracket will fix, so the TV is screwed into solid timber rather than plasterboard.
Where to put the fire: below, above or beside
Most media walls pair the TV with an inset electric fire, and its position shapes the whole design.
- Fire below the TV is the classic layout. A long, slim linear fire under the screen gives a strong horizontal line and keeps the TV at a sensible height. It does push the screen up, so the depth and height of the fire matter.
- Fire above the TV is unusual and rarely works for comfortable viewing, but a fire set high in a tall wall, with the TV on a separate section, can suit a room used mainly for sitting by the fire.
- Fire beside the TV works on wider walls. An asymmetric layout, with the screen to one side and a fire or a display niche to the other, keeps the TV at eye level and looks modern and relaxed.
Whichever you choose, the fire's installation manual sets the clearances and ventilation it needs, so pick the model before the design is fixed. We will cover fires, ventilation and TV height in more detail in a separate guide.
Alcove shelving and display niches
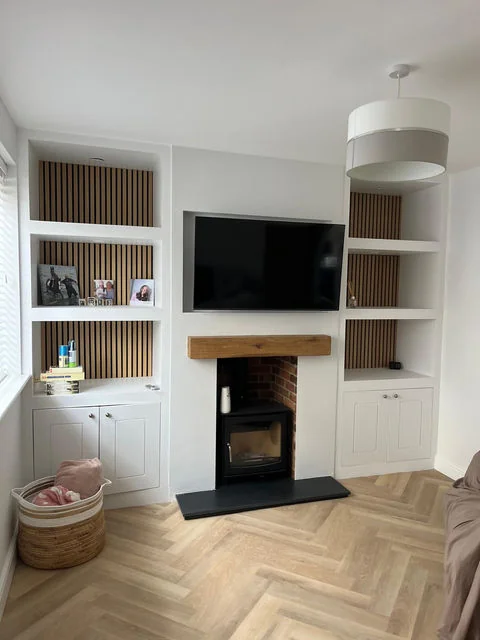
Recessed shelving either side of the TV breaks up a large wall and gives you somewhere for books, plants and the odd photo. Niches built into the frame look neater than shelves screwed to the face, and can be finished in the same paint as the wall or picked out in a contrasting colour or timber.
In older houses with a chimney breast, the alcoves are already there. Fitted cupboards with floating shelves above, either side of the breast with the TV over the fireplace, can be a better answer than covering the whole wall in a new frame. We have built both, and you can see examples in our fitted interiors and media walls gallery. Plenty of the interwar and post-war semis we see during building work in Loughton and Billericay have exactly this kind of chimney breast, and keeping it often suits the house better.
Lighting: LED strips and spots
Lighting is what turns a media wall from a flat panel into a feature in the evening. The two main tools are:
- LED strip lighting set into a channel along the top or underside of shelves and recesses, so you see the glow and not the strip. A warm white usually looks better than cold white in a living room.
- Small spotlights or downlights in a bulkhead or the ceiling above, washing light down the wall. These suit textured finishes because they pick out the surface.
Put the wall lighting on its own switch, ideally on a dimmer, so you can watch a film with a soft glow behind the screen rather than the main ceiling light. Colour-changing strips are available, but in our experience most people end up leaving them on one warm setting.
Slatted panels, textured and Venetian plaster finishes
A plain painted wall is clean and timeless, but the finish is where you can add character.
- Slatted timber or acoustic panels behind or around the TV add warmth and texture. They work best on one section rather than the whole wall, so they frame the screen rather than overwhelm it.
- Textured or limewash-style plaster gives a soft, mottled surface that looks good under side lighting.
- Venetian plaster is built up in thin layers and polished to a subtle sheen with real depth. It is hard-wearing and suits both modern and classic rooms.
Because a media wall is boarded and skimmed anyway, adding a decorative plaster finish is a natural next step rather than a separate trade. It is handled by the same team through our plastering service.
Hidden storage and cable management
A media wall should hide clutter, not create it. Plan for every box you own: broadband router, games console, set-top box, streaming stick and any speakers. Options include:
- Push-to-open cupboards in the plinth or lower units, with a socket inside and a way for heat to escape
- A conduit or cable route from the TV recess down to the cupboard, so HDMI leads can be added or changed without opening up the wall
- Sockets behind the TV, so the screen's power lead never shows
- A dedicated shelf or recess for a soundbar, sized to fit it
Remote controls with infrared signals need line of sight to the box, so either keep that box behind open shelving or check it can be controlled another way before shutting it behind a door.
Keeping it in proportion to the room
The most common mistake we see is a wall designed in isolation. A deep, chunky wall can eat a smaller room; a thin panel can look lost on a long wall in an open-plan extension. A few rules of thumb help:
- Keep the depth to what the fire and TV recess genuinely need. Every centimetre comes out of the room.
- Line the wall up with things already there: window heads, door frames, ceiling beams or the chimney breast.
- Centre the TV on the seating, not just the wall, and check the viewing position from the sofa.
- Leave some plain wall. A media wall with something in every square foot rarely looks restful.
In the newer homes around Chelmsford, living rooms are often compact and walls are plasterboard on studs, so a slimmer floating design usually suits better than a full deep wall. Larger extended or open-plan spaces can take much more.
A good media wall is a handful of clear decisions made in order: the overall form, the TV and fire, then shelving, lighting, storage and finish. Keep it in proportion, plan the cables before the boards go on, and let one or two features lead rather than all of them at once. If you would like a wall designed and built around your room, our media wall installation service covers the framing, electrics, plastering and decorating with one team.
Frequently asked questions
Yes, as long as it is designed for the room. Keep the frame as shallow as the TV recess and fire allow, consider a floating section rather than a full wall, and use paint in a similar shade to the other walls so it does not dominate. Open shelving and a slim linear fire keep it feeling light. The bigger risk in a small room is depth, so we always check how far the wall will project before agreeing the design.
There is no single right answer, but darker colours make the TV screen less noticeable when it is switched off, because the black glass blends in. Lighter colours keep a smaller room bright and let shelving and objects stand out. A popular approach is to paint the media wall one shade deeper than the rest of the room, or to pick out the TV recess and niches in a darker tone. Test large samples under your evening lighting first.
They can look excellent, especially framing the TV or running down one side of the wall. Timber slats add warmth and some acoustic panels help soften echo in rooms with hard floors. Use them on one area rather than everywhere, and keep them away from the fire unless its manual allows it, because they are combustible. They also collect dust in the grooves, so they suit people happy to run a vacuum brush over them now and then.
Usually, but it is far easier if you plan for it. A recess built with some spare width, or a TV niche with a lit or contrasting backing, can take a larger screen without changing the wall. If the new TV will not fit, the recess can be cut back and reframed, then boarded, skimmed and redecorated, but that is a small building job rather than a quick swap. Telling us your likely next screen size at design stage saves trouble later.
Thinking about a project like this?
Ask for a call back and Abbotts Build Hub will talk it through with you, or send us a message on WhatsApp with a few photos.